Showing posts with label paper house. Show all posts

Thursday, August 7, 2025

Paper Halloween Houses

I don't know what it is, but I really like making these little paper Halloween Houses.   I guess I have always been attracted to little miniatures, dollhouses, train displays etc.  There's something magical about imaginary scenarios.  

When I discovered years ago that I could cut out simple patterns for little houses similar to traditional Putz houses with my Wishblade, I was hooked.  

Here's a step by step process for the assembling of a fairly simple one.


After selecting the papers I want to use, I cut out the basic shape.  This design is a Silhouette file that can be found on the Silhouette Design Store website.


 I make sure to glue any embellishments such as window frames, decorations on before glueing the house together while it is still flat.  I glued on the tiny orange boards before I glued the sides of the house together.  It's much easier this way. Trust me, I know from experience.
What's a haunted house without boarded up windows?


Another step I like to do before I glue the sides is to crease all the creases so that I'm not trying to do so on an almost completely glued house.  It also helps to see edges and bends on the black paper a lot better.


Here's the roof piece.  I've creased the score lines to help making the attachment a lot easier.


For this design, I wanted to break up the color by adding another touch of orange.  So, I picked out this cute orange and black star print that looked very Halloweeny to me.  I  glued the printed layer to the solid-colored roof so that it adds another layer of strength to the house.

Here are the two roofs layered together.


Now for the really challenging part.  Adding the roof to the structure, making sure its even and centered before the quick-drying glue dries!  My preference for quick drying glue is Art Glitter Glue.  It dries fast and can be used with a narrow applicator tip,  But, I have to work fast.


Here's the completed house.


Now to paint the Styrofoam base. I try to use biodegradable materials whenever possible, but these little disks are sturdy, lightweight and just the right size of a base for my little 4"-5" houses.  I tell folks that when they are ready to trash their houses, make sure to recycle the parts that are recyclable and trash the base.


Now for the fun part - decorating the house.  I first added some grey colored spackle for the look of a textured path/walkway.


Then I added touches of white ink highlights to the house itself with a sponge.

:
Now for all of the "natural" embellishments: twigs, stones, seeds etc.


I always make sure to add enough glue to the twig-trees so that they stay firmly in place.


Trees in place.


After glueing my seed-pod-pumpkins in place, I added a splash of purple with a little natural moss.


And here's the final project as pictured on my Etsy site:


I hope you enjoyed this little demo of my house making process.  It looks like it's just one-two-three, but it takes more time than you think.  I have to pick he papers, cut the pieces glue and let the pieces dry, paint the base, let it dry. add any spackling I might add and let it dry then glue all the rest of it together.  


Tuesday, June 4, 2024

It's Only June, But its Halloween Time for Me

 It's only June but it's Halloween time for me.  I discovered the hard way, that folks start preparing for Halloween way before the start of October.  Some real diehard fans have Halloween on the brain year round.  So, because I sell my handcrafted Halloween items on-line, I have to have most items made by August the latest.  With summer being the outdoor time of the year in the mid-west, if I start crafting early, it makes it easier for me to dedicate some of those days to crafting not to mention getting things listed online.  

The first of my new projects for the 2024 Halloween season is another paper Haunted house.  I like to keep my paper houses on the small size because it makes it easier to find the appropriate paper and they are easier to ship.  

I start by selecting the colors and paper choices.  Then I get my base ready by painting it black. 


I then cut out all of the pieces I will need to start the house.  This one will be black and orange.  My favorite Halloween colors are the traditional ones.


Next, I glue on any pieces that need to be adhered to the house while it is still flat and  before I put the house together.


Then I glue the base of the house together before adding the roof.  For the glueing, I like quick drying glues like Art Glitter Glue  to hold things in place.


After the paint is dried, I gather up any additional embellishments before glueing the house to the base with hot glue.


I then work around the glued down house to add the additional decorative items.

After a few hours, I have a finished product.


Though I repeat the process over and over, I try to change up each little house by adding a little something different each time.  


Thursday, February 17, 2022

Easter Houses in Spring Colors

 Selecting colors for my projects is never easy for me.  I don't have that "eye" for which colors go with which.  So it's always a hit or miss and I have to hope for a "hit".

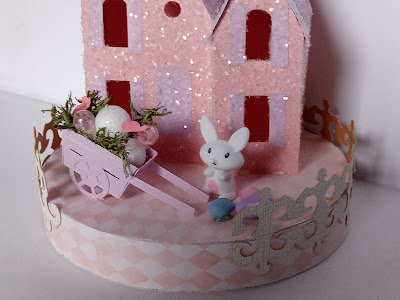
I decided to go with soft spring colors instead of vibrant ones.  Instead of bright pink and purple, I choose muted pink and lavendar.  And I can only hope the rest work together.

Little is always more attractive to me, so I made these 4" tall,  small enough to easily fit on a Dollar Tree Foam disk.  I cover the disk in a complementary paper and trim the disk with a paper fence.  I made a little paper push cart and filled it with baubles and paper flowers,  and  finished with a few clay Easter eggs.

Pictured below are the houses I've completed.


Sunday, February 13, 2022

Making Easter Putz

 Spent this cold, Sunday afternoon working on my Easter Putz style houses.  Even though they are machine cut, they still take oodles of time.  

I decided to go with pale, spring colors.  I find them soothing and they go well with our recent grey winter days.  

After cutting the papers, I simple mixed and matched the roofs, shutters and doors.  Once I get all the pieces glued together, I spread glue all over the piece and sprinkle on sparkly glitter.  I wasn't going to glitter the houses because some folks might think it looks like snow, but what's a Putz house without glitter? 

Now to attach them to a base and embellish them a little more.


Monday, July 5, 2021

Getting in on Christmas in July

After making those haunted houses, I saved one of the domes for a Christmas ornament.  I couldn't help but make a tiny gingerbread house to slip into it.  I've always loved the look of a gingerbread house with all the white trimming and the colorful candies.  But baking and making one in the traditional way never quite worked out for me.  I could never get the frosting to flow right or the layers to stick together.  At the end mine always looked like a lump of mess.  So I  gave up on that skill a long time ago.

For those of you like me, all thumbs and no fingers, you'll appreciate this little paper gem.  I had to resize the file to fit, but it only took a few attempts before I got it where I wanted it.  I made some "snow" from glue mixed with baking soda and white paint.  After adding it to the roof line and around the bottom, I sprinkled it with glitter to add some sparkled.  I still need to add some ribbon to the base, but I haven't quite figured out how I want to do that.